














Free SSH client for Mac: keys, SFTP and tunnels
A Raspberry Pi, a NAS, a cloud server: sooner or later you need to SSH into it. On a Mac, Terminal is enough to start; here is how to do it properly, with keys instead of passwords, and when it is worth moving to a client with an interface.
In short: SSH is already on your Mac: open Terminal and type ssh user@address. To stop typing passwords, create a key with ssh-keygen -t ed25519 and copy it to the server with ssh-copy-id; to stop remembering addresses and ports, use the ~/.ssh/config file. If you run several servers and want files, tunnels and keys one click away, an SSH client such as Termina (free, for macOS 15 or later) keeps everything in one list and protects your keys with Touch ID.
Connecting from Terminal
Every Mac ships with the OpenSSH client. Open Terminal (in Applications › Utilities) and type:
ssh pi@192.168.1.50
ssh deploy@server.example.com -p 2222
The first time, the Mac shows the server's fingerprint and asks whether to trust it. Compare it with the server's own (ssh-keygen -lf /etc/ssh/ssh_host_ed25519_key.pub, run on the server) and answer yes. If the fingerprint ever changes and you did not reinstall the server, do not connect: it may be an attack.
Keys: no more passwords
An SSH key is safer than a password and saves you typing one every time. You create it once on your Mac:
ssh-keygen -t ed25519 -C "my-mac"
ssh-copy-id pi@192.168.1.50
The first command creates the key pair in ~/.ssh/ (choose a passphrase), the second adds the public key to the server's ~/.ssh/authorized_keys. From then on ssh pi@192.168.1.50 gets in without asking for the server's password. The private key (id_ed25519, without .pub) should never be copied anywhere else.
The ~/.ssh/config file: a name for every server
Instead of remembering users, ports and keys, give each server a name in ~/.ssh/config:
Host homelab
    HostName 192.168.1.50
    User pi

Host web
    HostName server.example.com
    User deploy
    Port 2222
    IdentityFile ~/.ssh/id_ed25519
Now ssh homelab is enough. The same file also holds jump hosts and tunnels, and it is what SSH clients can import.
Tunnels and jump hosts
- Local tunnel (
-L):ssh -L 5432:127.0.0.1:5432 webmakes the server's PostgreSQL database reachable on your Mac at127.0.0.1:5432, without exposing it to the Internet. - Remote tunnel (
-R): the opposite, it opens a port on the server that leads to your Mac. - Jump host (
-J):ssh -J bastion internal-dbreaches a server you can only see through another one. In the config file it isProxyJump bastion. - Agent forwarding (
-A): letsgiton the server use your key without copying it. Only turn it on for servers you trust.
When Terminal is not enough
With one or two servers Terminal is perfectly fine. With many servers, tunnels to open and close and files to edit, the things to remember multiply: which key goes with which server, which port the database tunnel uses, which folder that config file was in. This is where an SSH client with an interface saves time. The best-known options on Mac are paid or keep their best features behind a subscription; Termina is free and native.
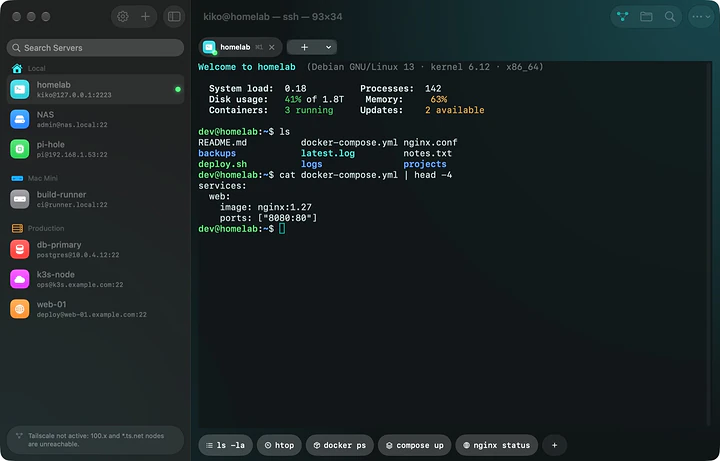
- A server list with groups, colours and icons; Quick Connect to type
user@hostas in Terminal. - Passwords and keys in the Keychain, unlocked with Touch ID. Termina can also create the key inside your Mac's Secure Enclave: it cannot be exported or copied, even if you wanted to.
- SFTP files next to the terminal: drag to upload, open a text file to edit it on the server.
- Tunnels
-Land-Rwith live status and traffic, jump hosts up to 4 hops and agent forwarding. - Snippets with variables such as
{{host}}and{{service}}, per-server history, two sessions side by side with ⌘D.
Bringing the servers you already have into Termina
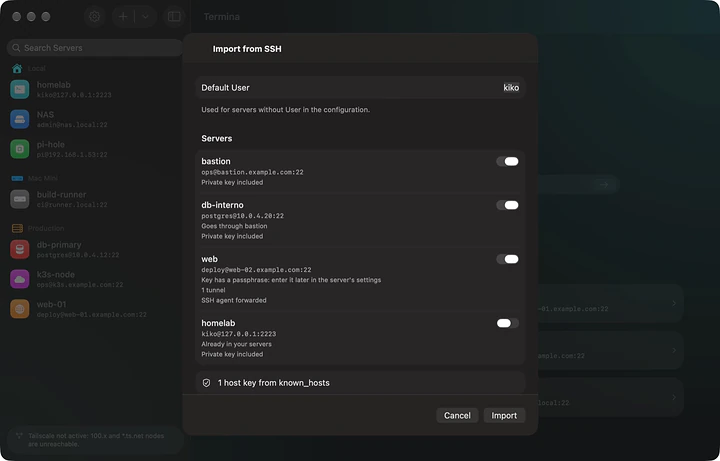
If you already have a ~/.ssh/config, there is nothing to retype: in Termina choose File › Import from ~/.ssh… and select the .ssh folder in your home folder (it is hidden: press ⌘⇧. in the panel to see it). Termina reads Host, HostName, User, Port, IdentityFile, ProxyJump, tunnels and ForwardAgent, with the private keys and the trusted hosts from known_hosts. You see a preview and pick what to import; your files are not changed.
Sessions you do not lose: tmux
If the connection drops (Wi‑Fi, Mac asleep) the shell on the server closes, and the commands running in it with it. For long jobs use tmux on the server: in Termina type a name in the server's tmux session field and every reconnection takes you back to the same shell, with everything still running. From Terminal you get the same with ssh -t homelab tmux new-session -A -s work.
If something goes wrong
| Message | What to do |
|---|---|
| Permission denied (publickey) | The public key is not in ~/.ssh/authorized_keys on the server, or the permissions are too open: on the server run chmod 700 ~/.ssh and chmod 600 ~/.ssh/authorized_keys. |
| Connection refused | The SSH server is not running or listens on another port: check Port and that the sshd service is started. |
| Host key verification failed | The server's fingerprint has changed. If you reinstalled it, remove the old one with ssh-keygen -R address; otherwise do not connect. |
| 100.x or *.ts.net addresses unreachable | Turn on Tailscale on your Mac. |
Frequently asked questions
Do I need an app to use SSH on a Mac?
No: the Mac's Terminal already has the ssh command. A client such as Termina helps when you have many servers and want files, tunnels and keys in an interface, with Touch ID.
Is there a free SSH client for Mac?
Yes. Besides Terminal, Termina is a free native SSH client for macOS 15 or later, with SFTP, port forwarding, jump hosts and import from ~/.ssh, with no account.
Where does an SSH client store passwords?
It depends on the client. Termina stores them only in your Mac's Keychain, unlocked with Touch ID, and with iCloud sync it encrypts them end to end. Keys created in the Secure Enclave never leave the chip.
How do I open the hidden .ssh folder on a Mac?
In Finder or an Open panel press ⌘⇧. (Command, Shift and period) to show hidden files; or type open ~/.ssh in Terminal.